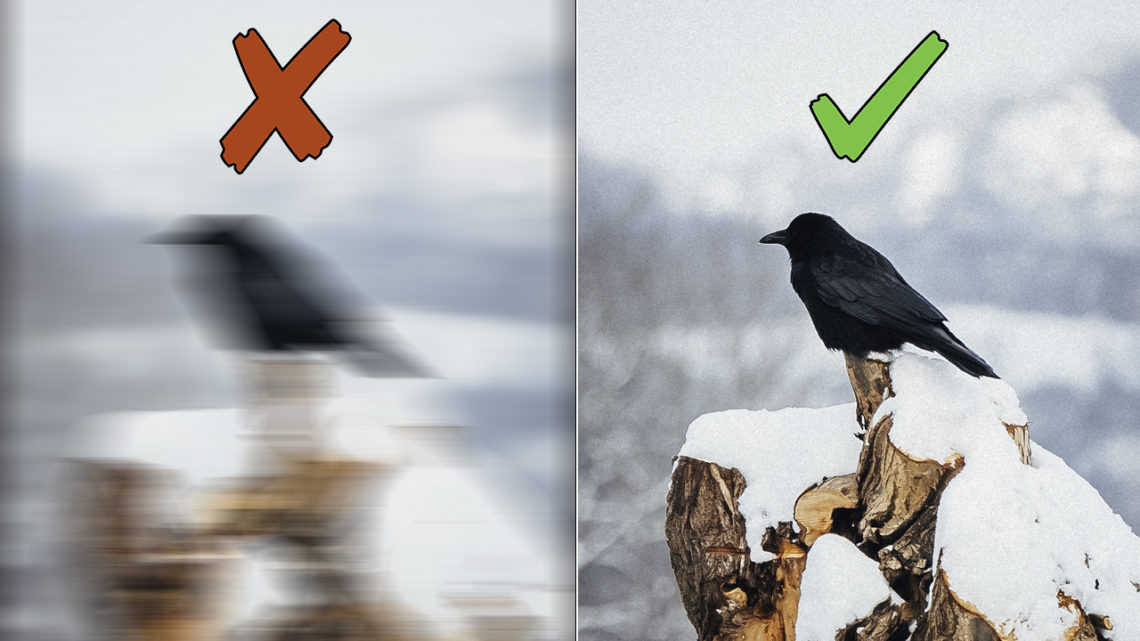
Alright so let’s talk about taking photos of moving objects and how to get better results!
Fast Shutter Speed
So obviously when a subject is moving around you need to be fast enough to take a sharp image. If you try to take a picture of an animal that is moving around and your camera needs too much time to take the photo of course the photo will be blurry. So the first step to take sharp images of moving objects is to use a fast shutter speed to avoid the problem that your camera needs too much time to take the image. And here it depends on your key element. Of course a slowly moving leaf don’t need an extreme fast shutter speed but if you take photos of a sports car in a race that’s a complete different situation. In this case I always try to take some test shots and then I simply check them to see if my shutter speed is ok or if I need to adjust these settings. So definitely don’t be afraid to take test shots before you actually start to focus on the composition.
Increase The Aperture
But now let’s move on with tip number two and the next tip that I want to talk about is Aperture. Of course if you use a fast shutter speed it will make your overall image darker and in most cases you try to compensate that by adjusting the aperture to make the image brighter. But an aperture of 1.8 for example can increase the bokeh in your image and less elements are in focus. So it is actually possible that parts of your key element won’t be in focus anymore which can be really bad. So if you notice something like that you maybe need to increase your Aperture settings to get your key element completely back in focus.
High ISO
But if you use a fast shutter speed and a high f-stop these settings will make your image darker. So especially in low light situations these settings can create some problems and thats why we need to talk about ISO next. Of course everyone says “Only use that much ISO that you need to take the photo”. And exactly thats it. That doesn’t mean that you can’t use higher ISO settings to compensate your Shutter Speed and Aperture settings. In this case I highly recommend to check how much ISO you can use until you notice a huge loss of quality in your images. To do that just put your camera on a tripod and take photos with all kind of ISO settings until you have a couple of test shots that you can check in your editing software. Thats in my opinion the easiest way to figure out how much ISO you can use.
Use A Flash
The next tip that I want to give you is to use a flash. I know… I know. I mostly say don’t use a flash at all because especially if you use a smartphone this can create some harsh images but if you need to take photos in low light situations and you can’t improve your settings anymore a flash can actually help you. So if you know that you can’t add any other additional lights use the flash. Another aspect that I need to mention is of course that this is just for some short distances and you shouldn’t use a flash if it can be distracting for some other people. So for example if you need to take photos of a sports event a flash won’t help you and it can be distracting but if you take photos of a model a flash can be helpful. So it always depends on what you want to do. But as I already mentioned a flash can create some harsh images so you definitely need to know if a flash can actually improve your image or not.
Focus Mode
But now let’s move on with the next tip and this is all about the Focus Mode. The right focus mode is actually something that is really important because if you try to freeze the motion your focus point needs to be on point. So thats why I highly recommend to use the continuous focus because in this case you can use this to keep the focus while the key element is still moving around. So for example if you have a good face detection auto focus like the one of the R5 here you can use that to get some awesome images because it will keep the key element in focus.
Stay Frosty!
——————
E-Mail: info@digitalabsorption.de
➥ Subscribe On YouTube ⇢ https://bit.ly/2Bn7aaq
➥ Follow me on Instagram: https://bit.ly/2S6tws1
➥ Follow me on Twitter: https://twitter.com/DigitalAbsorpTV
Gear:
● My Main Camera : https://amzn.to/30sGZMD *
● My Second Camera : https://amzn.to/2Ljw7bv *
● Perfect Camera To Get Started : https://amzn.to/2UgcXrj *
● Microphone 1: https://amzn.to/2ZDPUYg *
● Microphone 2: https://amzn.to/2ZEVFoO *
● Microphone 3: https://amzn.to/2zw1gTF *
● Interface: https://amzn.to/2NJN8yv *
● Monitor: https://amzn.to/2NMcjkd *
● Headphone: https://amzn.to/2UhPGFd *
● Softbox: https://amzn.to/2L7O26m *
● Cheap Smartphone Tripod: https://amzn.to/2MMfSXT *
● Cheap DSLR Tripod: https://amzn.to/2HxuciM *
● Drone : https://amzn.to/2NHWv1C *
● GoPro Hero 7 Black : https://amzn.to/3eZ6oT9 *
● GoPro Chesty : https://amzn.to/2AfcJuL *
● RF 35mm : https://amzn.to/2zUs4xa *
● RF 24-105mm : https://amzn.to/2PPFCoA *
● EF 50mm : https://amzn.to/34mUOg9 *
● EF 18-55mm : https://amzn.to/2UI2wgx *
● EF 10-18mm : https://amzn.to/2POPFKw *
● Tamron 70-300mm : https://amzn.to/34wudxl *
● Additional Music : https://artlist.io/Bjoern-1377240 *
*Affiliate-Link Disclaimer: Some of these links are affiliate links where I’ll earn a small commission if you make a purchase at no additional cost to you.


Comments by Björn